Using Custom Textures
Using Custom Textures allows you to replace the model's built-in textures with your own custom image files. This provides the most direct way to modify your character's appearance, as you're editing the actual image files that the model uses.
What Are Custom Textures?
Custom Textures are PNG image files that replace the model’s original texture files. The image shown here is an atlas page. The atlas page contains a collection of regions.
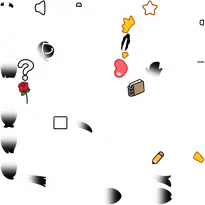
The atlas page is the image source that the model directly references at runtime. When you enable the Use Custom Textures option and reload the textures, EmoteLab looks for the atlas pages, and uses them in place of the built-in textures. The changes then become visible in the model preview immediately.
Texture Cache Folder
The atlas pages are stored in the texture cache folder at:
C:\Users\<username>\Documents\EmoteLab\Texture Cache\[ModelName]\Custom Textures
If the system Documents folder has been relocated, the files may instead be found in a different drive or path, such as:
E:\Users\Documents\EmoteLab\Texture Cache\[ModelName]\Custom Textures
When you first enable Custom Textures, the system automatically creates the following folder structure:
Custom Textures/
  ├── {atlas1}.png
  ├── {atlas2}.png
  ├── {atlas3}.png
  └── ... (additional atlas files)
How to Use Custom Textures
Step 1: Navigate to Texture Settings
- Open the Color tab: Click on the
Color tabat the top of the interface (it has a color/palette icon) - Locate the toggle: Find the Texture section at the lower right corner of the interface
Step 2: Switch to Custom Textures
- Enable the toggle: Click the
Use Custom Texturescheckbox to enable it - Wait for setup: The system will automatically set up the custom textures folder
- Observe changes: The model will update to use custom textures. If it is the first time using this feature, there will be no visual changes since the built-in textures will be copied to the custom texture folder as templates.
Step 3: Editing Custom Textures
- Open the texture folder: Click the
Open Custom Texture Folderbutton. This will open the folder in your system's file explorer - Choose an image editor: Open the PNG files with any image editing software
- Edit the files: Make your desired changes to the texture images but follow the rules:
- Must maintain the same image dimensions
- Must preserve transparency (enable alpha lock in your image editing tool)
- Save your changes: Save the PNG files with the same names and overwrite the existing files
- Exact name matching: All atlas must have the exact same names (case-sensitive) as the original atlas
- Exact dimension matching: All atlas must have the exact same dimensions as the original atlas
- No missing files: All atlas pages must be present
Step 4: Reloading Textures
- Return to EmoteLab: Switch back to the EmoteLab application
- Reload Textures: Click the
Reload Texturesbutton in the Texture section - View the character in the viewport: Your changes will appear immediately in the viewport
You must click Reload Textures after editing files for changes to appear.
Switching Back to Original Textures
To return to using the original built-in textures:
- Uncheck the toggle: Click the
Use Custom Texturescheckbox to disable it - Model updates: The model immediately switches back to original textures
Step 5: Saving your changes
Follow the steps in character management to save your character with custom texture.
The custom texture folder is NOT for saving edited textures. Your custom texture files remain in the folder when switching back to original textures. However, loading a character with custom texture enabled will OVERWRITE. To save the edited texture, you MUST save a character with the Use Custom Texture option enabled.
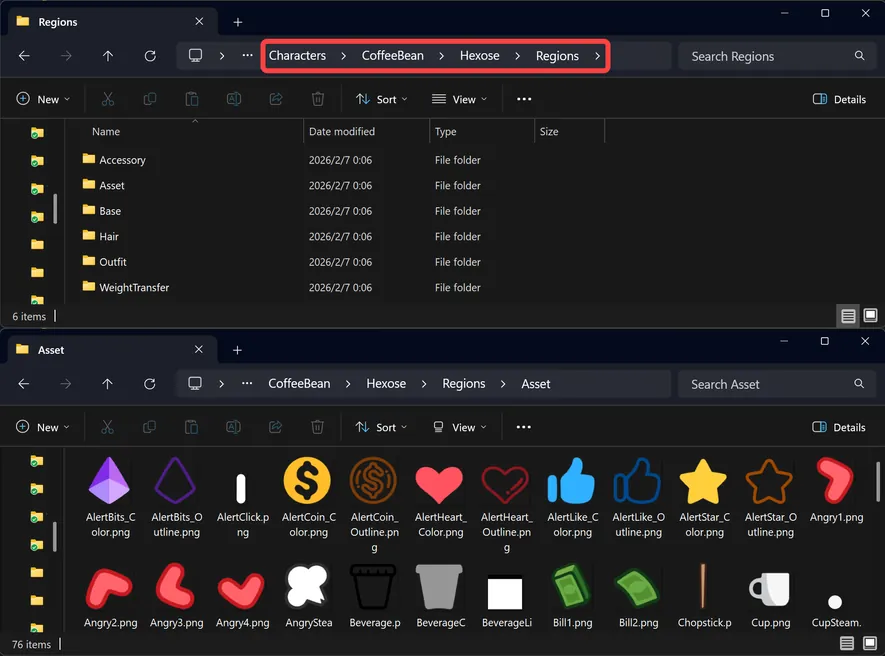
When a character is saved with custom textures, EmoteLab unpacks the atlas pages and stores the edited textures as individual region PNGs. This approach allows EmoteLab to manage compatibility of custom characters between model updates, where regions may be added, removed, or reordered.
How Characters with Custom Textures are Handled
When saving a character:
- EmoteLab saves the character data (active parts, slider adjustment, coloring information) into a JSON.
- The atlas pages are unpacked into region PNGs and saved along side the character data json file.
- Source: Texture Cache/[ModelName]/Custom Textures/ (full atlas pages).
- Target: [CharacterFolder]/Regions/ (individual region PNGs).
When loading a character:
- EmoteLab reads the character data JSON file.
- If the character is using custom texture, EmoteLab will look for the
Regionsfolder. - The region PNGs are packed into atlas pages and put in the cache
Custom Texturesfolder.
If the region exist (previous edited version), the app will load the edited region. If the required region does not exist (if new regions are adeed to the model or due to the removal of regions in the region folder). the app will fall back the to the regions in built-in textures.
3. Emotelab will then repack all the regions into atlas pages and put them in the cache Custom Textures folder.